Google Adwords Settings- An Introduction

Have you ever wondered what all those setting are in your Google AdWords campaign? Well, don’t feel bad if you don’t know.
I’ve come across more than a few people who have campaigns up and running that haven’t gone through and made sure they understood the nitty-gritty details of their paid search campaign. I can’t think of a better way for small business marketers to throw away advertising dollars. Let’s take a look at a few of those settings that play a large role in your campaigns success. All the settings below can be found by selecting your campaign in Google Adwords and then pressing the “Edit Settings” button.
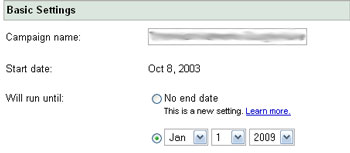
Basic Settings
These settings are…well…basic. But, there is a pitfall to recognize here.
- Campaign Name: The name you designate here is just simply a name you will recognize that differentiates this campaign from others in your account.
- Will Run Until: Although this setting is quite self-explanatory, overlooking it can cause you to overspend or underspend. If you’re seasonal and your ads stop after Christmas, for example, make sure you indicate a date to stop the campaign rather than relying on your memory. If your campaign has no end date, use the new feature that allows you to indicate that. That was not around when I started with Google Adwords and I fell into the pitfall of having my campaign stopped because I didn’t push the date out far enough.
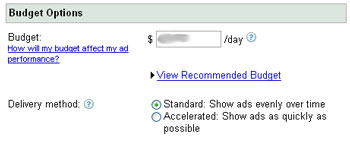
Budget Options
Your money is on the line here so pay attention to these settings.
- Budget: This is a DAILY BUDGET number. Not monthly. Not Yearly. DAILY. If you run campaigns where you do not show ads on the weekends and only on weekdays, make sure to adjust your daily budget accordingly to coincide with the fluctuation in monthly business days. I allocate a certain amount per month to my campaigns and the daily budget changes month-to-month because the amount of actual business days is different from month-to-month.
- View Recommended Budget: This is what Google feels you should be spending. Unfortunately, Google is not in your budget meetings and doesn’t know how much in reality you have to spend. But, check it out and see what they recommend, but remember there are other ways to maximize your spend than just loading in more money.
- Delivery Method: You can have Google use up your budget early in the day and show your ads very quickly or you can have them space them out and try to make them last throughout the day. I typically have them space them out and even using that method I’ll notice my ads show more often in the morning. Another reason I like to try to space them out is because not everyone is going to research and buy my products in the morning. I actually find I get more quality leads later in the afternoon.
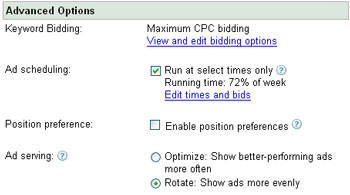
Advanced Options
Here is where you really begin to manage a campaign.
- Keyword Bidding: With Keyword Bidding you can select how you want to handle the process for deciding the amount you’re paying per keyword bid in the campaign. Options include Maximum Bidding (max CPC you’re willing to pay), Preferred Bidding (setting average CPC you want to pay), Budget Optimizer (Google manages your bids to get most clicks), and Conversion Optimizer (Google’s new cost-per-acquisition tool). With the budget and conversion optimizer, ad scheduling is turned off so the option to not run ads during certain times is lost. Sticking with max bidding or preferred bidding at the campaign level gives you the most control over where your ads place and how much you spend for that placement.
- Ad Scheduling: A very powerful setting that allows you to set when your ads appear. Only targeting morning searchers Monday through Thursday? Well, you can run your ads during those times using this tool. Find out when your audience is most likely to want to see your ad and have maximum exposure during that time.
- Position Preference: Another useful utility that let’s you try to place your ad in certain positions on the SERP. If you know your ads convert the best in positions 4-6 than only put your ads in those spots. Remember, it’s not a given that your ads will perform better because they’re in the top spot. Test, Test, Test!
- Ad Serving: I’m not a fan of letting Google decide which one of my ads is performing better so I typically choose to show my ads more evenly. This is a must if you’re doing any kind of ad copy testing. Through your copy testing you’ll be able to figure out yourself which calls to action or benefit points works best.
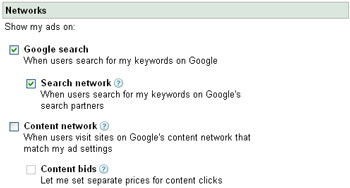
Networks
Where will your ad be appearing? Decide that here.
Network settings is where you indicate on what Google mediums you want your ads to appear. Your options are the Search network which are Google.com and search engines in their network like Ask.com and/or Google’s Content Network. The Content Network is where Publishers place contextual advertising (Google AdSense) next to relevant content. In theory your ads appear next to content that closely matches the content of your ad.
This could be the topic of one (or two) future articles, but if you’re just starting out I would recommend putting a campaign on the Search Network then making a copy of that campaign and launching it on the Content Network. I typically have different ad, bidding, and placement strategies for my Content Network campaigns and choose to set them up separately. You’ll be able to get a good idea of how well your ads and landing pages convert on the Content Network versus the Search Network. Keep in mind also that your Content Network click-through-rates (CTR) will be much lower, but this will not negatively affect your Quality Score.
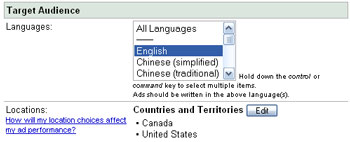
Target Audience
Now it’s time to indicate who will see your ads.
- Location: Do you have a local business that serves only a small geographical area in your town? No problem. With these selections, you can select either a country/territory, region/city, or a custom location that is within a specified distance from a location you choose. The more specific you are in your geographical selection, the more targeted your ads will be – and in some cases cost less per click. A big pitfall here would be to select the whole US when you serve a much smaller area. You’ll wind up with many unqualified clicks. Remember, even in the US, it might make sense to launch separate campaigns by region as more localized reference or text might appeal more to each individual region.
- Languages: This is fairly self-explanatory, but I mention it here because I think it’s important to point out that you can launch a campaign in Japan and actually use the Japanese language in your text. I would NOT try to launch a global campaign and only use English in your ads.
So, dig in and create your ads, do your keyword research and then make sure you’ve covered your bases by selecting the setting options that are right for you and your campaign. Neglecting that step can cost you and your small business some valuable budget pounds.
If you found this post useful please let me know and I’ll do some more.

